Roasted toasted squash

image

Ingredients

1/2 butternut squash

1 tsp cumin seeds

2 tsp black roasted sesame seeds

2 tbsp coconut oil for roasting

Method

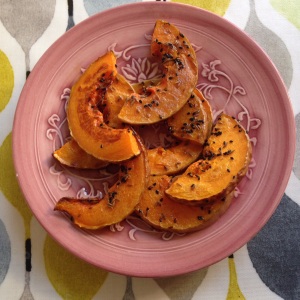
Preheat the oven to 180C/350F/Gas mark 4. Cut the squash across in to slices that are around 1/2 inch thick. Melt the coconut oil, then add to the squash in a roasting tray. Sprinkle on the cumin and sesame seeds. Mix well ensuring all the squash is coated in oil and seeds. Roast in the oven for 30-40 minutes, or until gently browned. These are delicious and  loved by my baby and 3yr old. They are also great portable snacks to take out, once cooled.

The sesame seeds add a boost of vitamins and minerals. Be mindful if your child has a peanut or tree nut allergy as many people with nut allergies can also be allergic to seeds, including sesame. I use sesame seeds all the time as a fabulous source of protein, they can be used whole or in the form of tahini. I have recently discovered the black roasted variety and I’m totally addicted !

The wonders of coconut oil

image

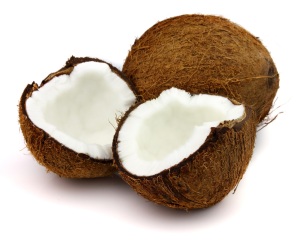
Coconuts are part of the palm family, classified as a fruit and very definitely not, but commonly mistaken for a nut. It seems fitting to write about coconut oil in the first month of 2015, as this is the year I’m going to use it even more than I do already, which is already quite a lot ! I also made a delicious crumble today from the “Oh She Glows Cookbook” and paired it with whipped coconut cream (also from Angela Liddon’s wonderful book), the cream was fantastically simple and devilishly delicious.

I discovered organic coconut oil a couple of years ago and used it occasionally to cook with, but admittedly wasn’t taken with it, and didn’t really know what to use it for. Since having to follow a dairy free diet because of my daughters food allergies, I now use it daily and it’s a definite cupboard staple. I even had to ask a lovely friend to do a Whole Foods coconut oil dash prior to joining us to celebrate New Years Eve.

My son eats it straight from the spoon as I do too ! I now use it as butter and oil for most cooking, I don’t use the dairy free spreads I have done before. It’s my go to snack. Spread it thickly on a seeded rice cake-yum yum ! It’s fantastic for cooking curries, roasting vegetables, making stir-frys, melting in sweet potato jackets and stirring through steaming porridge.

So what’s all the fuss about it ? One of the benefits of cooking with coconut oil is that it can withstand high temperatures, as it doesn’t oxidise, which essentially means it’s doesn’t react with oxygen to form harmful compounds and free radicals like many other oils-very bad news for health. Its high in saturated fat, but i’m pretty sure we all now know that not all fats are the same, infact the right kinds of fats are incredibly good for us, think avocado’s, nuts and seeds. Coconut oil is a medium-chain triglyceride (MCT)  meaning it’s more easily absorbed, digested and used by the body as a source of energy. Coconut oil can even boost metabolism and reduce cholesterol. It’s high in lauric acid which helps to maintain blood sugar levels. Just try it and I’m sure you’ll love it ! I am a definite convert. Biona is my brand of choice, it’s pure indulgence and amazingly good for you !


Mini chia pancakes

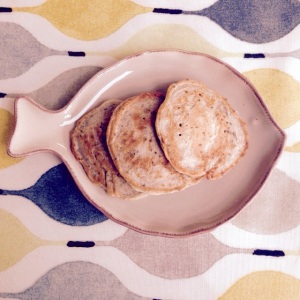
These pancakes are a perfect finger food for litte hands. I have used a chia egg of a normal egg as my daughter has been egg free for a few months. It super simple, you just add 1tbsp of chia seeds to 3 tbsp of water, leave for 15 mins then use as you would an egg.

image

Recipe 

1 chia egg

1tsp baking powder

90g buckwheat flour

150mls milk (I use Oatly, you can use the milk of your choice)

I add in 1tsp of cinamon when making breakfast pancakes and 1tsp oregano when making savoury pancake.

Makes approx 6 mini pancakes depending on size. Store in the fridge if not eating at one sitting . Can be eaten cold, or you can warm them in a pan or the oven for a couple of minutes. They are a useful finger food to take out for snacks or lunches, and you don’t need teeth to eat them !

Method

Combine all the ingredients in a bowl minus the coconut oil. Mix well.

Heat the coconut oil in a pan, add a small ladleful of the mixture  to make a mini pancake, fry on each side for 1-2 minutes on a medium heat, keep a close eye, they brown quickly. I normally make 3 at a time.

To serve I top them with a houmus, nut butters or a mashed banana and 1/2 tsp tahini to up the protein. If avoiding nuts you can put anything spreadable on the pancakes. For my 3 yr old who doesn’t have allergies I top them with soft cheee, cottage cheese , mashed roasted veg and coconut oil sprinkled with whizzed up seeds.

Allergies

A little word on allergies. The most important advice I can share both as a Mother and Nurse is that if you have suspicions that your baby or child has a food allergy, please ensure that you seek referral to a specialist allergy service. By this I mean speak to your GP/Health Visitor/Paediatrician and discuss referral. It’s paramount not to embark on an exclusion diet for your child or yourself (if breastfeeding) without specialist dietary support. My advice would be to avoid intolerance/allergy testing provided by health food shops, alternative health practitioners and such like. They are not supported by evidence base or research, at best they can be a complete waste of time and money and at worse detrimental to health. Growing babies and children need optimal nutrition to develop and it is vital food groups are not omitted without dietary advice.

Infant milks

Babies reacting to normal formula milks may need prescription only specialist milks. Goat and soy based milks are not recommended for infants. Please seek specialist advice. If you suspect your child has a cows milk protein allergy more information can be found here :

http://www.isitcowsmilkallergy.co.uk/

http://www.allergyuk.org/advice-for-parents-with-a-new-baby/is-my-child-allergic-to-cow-s-milk-protein

Breastfeeding Mums

If you are a breastfeeding mother and suspect your baby is reacting to your breastmilk, then an exclusion of cows milk protein from your diet may be necessary, if this is the case you need to ensure you are obtaining adequate calcium and will likely need supplementation, Breastfeeding mothers require 1200 mg calcium per day, again support from a Dietician is vital. There are a fantastic range of non dairy milks available in all supermarkets now which include oat, coconut, almond, hazelnut, hemp, soya and rice milks. Look out for milks fortified with calcium, remember there are lots of non-dairy sources too, some of the highest calcium containing foods include soya beans, chickpeas, tofu, watercress, parsley, dried figs, almonds, sesame seeds and tahini paste. Some babies may react to soya products too. Many of my recipes are great for breastfeeding Mums, I’m currently on an exclusion diet of dairy and soya as my daughter has delayed allergies to both-another reason for starting this blog ! It can feel hugely overwhelming at first having to completely cut out food groups, but it is totally achievable and not as difficult as you think. I found it challenging at first, 5 months later it’s pretty normal and it’s not forever after all……………



First foods

Ideas for first foods include, steamed apple and pear quarters, they are also yummy roasted in the oven and sprinkled with cinamon. A reliable staple of ours is carrots roasted in oil (I use rapeseed or coconut) sprinkled with cumin seeds-both my children also adore sweet potatoes and pumpkin/butternut squash cooked this way, the sweetness of the veg works beautifully with the warm earthiness of the the cumin, utterly delicious ! Steamed broccoli and cauliflower trees are perfect for little hands as long as they are well cooked. Banana sticks, rounds of cucumber, pineapple rings, mango wedges, melon slices (watermelon is easiest) are all great starter foods-just a little preparation and you are good to go, big chunks all the way means they are easy to pick up (with practice!) and safest. Its quite normal for babies to gag at first as they are learning new textures and to move food to the back of their mouths, always stay with your baby when they are eating. As its winter I’m using lots of the delicious root vegetables on offer, they are perfect for little hands and beautifully sweet when roasted.

Starting your weeny weaner

image

Starting off

Baby led weaning is super easy, far less faff than pureeing, but you need to know it is messy ! I had forgotten quite how messy it was, and found starting weaning the second time around much more difficult to get going with. The mess was a bit overwhelming, I did learn to embrace it quickly, there was no other way ! Washable cloths, kitchen towel, long sleeved and wipe clean bibs have become essential. I’ve now given into a quick blast of the hoover and a swish of the steam mop after meals to keep the floors and me looking happy. Mess is inevitable, it’s also what baby led weaning is all about, your baby learning about food through exploring different tastes, textures and most importantly enjoying the experience. There was nothing more rewarding than watching my son chow down different foods with a voracious appetite. It’s given him the best start and has laid the foundation for what I hope will be a healthy relationship with food for the rest of his life. I’m excited to watch my daughter get going with food-she can at 7 months pick up foods really well and chomp foods offered to her. Spaghetti and noodles are favourites-she shovels them in and sucks up the rest !A joy to watch ! Lots of my friends choose to give their children a mixture of purees and finger foods-if this approach suits you rather than going completely baby led then I would encourage you to keep trying new finger foods to offer alongside purees. You’ll be amazed how quickly your baby will develop the necessary skills to self feed.

Cups

Tommee Tippees are fab starter cups, cheap and readily available, I also love the NUK first choice learner bottle. Both have free flow spouts which are best for babies learning to drink. Prolonged use of bottles, particularly at night time can lead to dental caries. I started offering cups to both my babies at around 4/5 months. At that age they definitely need help and with practice will quickly learn how to lift the cup and get it to the right place ! My daughter could independently use her cup at 6 months. They do get a bit wet but nothing a good bib can’t handle. Grab your tools and go !